The ultimate guide to starting a frugal off grid living homestead for beginners

The ultimate guide to starting a frugal off grid living homestead for beginners

SUBSCRIBE FOR UPDATES
I have lived off-grid, full-time, for four years now. I'm over an hour from the nearest town and over two hours from the city.
My intention has always been to be as self-sufficient as possible. I like to imagine what would happen if I were cut off from civilization. What would I need to sustain my homestead? I do my best to prepare accordingly.
I was homeless when I bought my property, and I moved out here with nothing more than a camper van, two containers for water, and a year's supply of food.
I have written three books, but so much has happened since I wrote them that I have been asked to expand on my experiences. Instead of selling you a new book, I'm giving you everything I know in an interactive and entertaining guide, packed with pictures and videos from the past four years to provide examples of each topic. This guide will cover everything from the beginning to now, giving you a good overview of what I've learned along the way.
Go Fund Me for frugal off grid, help us build our american dream. We are building security through sustainability
OFF GRID SHELTER
One thing I talk about above all else is providing yourself with food, water, and shelter right out the gate. We'll start with shelter because you can die overnight without shelter, then we'll cover water because you can only go days without water, and finally, we'll talk about food because apparently, you can live several weeks without food, although I've never gone more than three days.
By building myself a makeshift camper van before moving off-grid, I afforded myself shelter from the moment I pulled onto my land. Depending on where you're moving, this may not be an option, but that doesn't mean you should give up. Worst case scenario, you'll be required to install a septic system and build and permit a home.
If that's what you have to do, it's just another way of reaching your end goal. Just look at it as a portion of the overall cost. You may be able to build out a shed, park an RV, or a tiny home on your land. These are all similar options that will yield a home for your homestead.
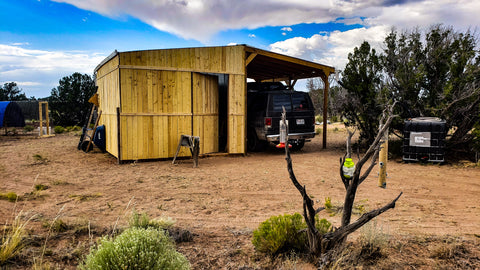
In addition to my camper van, the first shelter I built was my shop. Being under 200 sq ft means it doesn't require permits. It's basically a shed. It cost me about $4000 in materials. The main purpose was to store my tools, supplies, and food. In an emergency, I could stay in there as well. The shop created a surface to harvest rainwater, so connected the IBC totes for storage. 
Book A Video Call
Other shelters included animal shelter, greenhouses, and the root cellar. Many systems on a homestead can be used for multiple purposes. I'll expand on these systems later. With shelter in place, I began to focus on water.
RAINWATER HARVESTING
Water is life; it's important to have a system for water right out the gate. For me, this meant having a trailer and a water tank so I could haul water until I built a large enough rain-harvesting system.
The next steps I took were to build my shop with a corrugated roof that would harvest rainwater and gutters that would direct this water to my IBC totes for storage. Installing wire mesh will keep pests from getting into the water storage; chlorine will kill bacteria, and filtration will remove impurities, including 99.9% of the chlorine you add.
I have been able to expand on my system as my homestead has grown. I dug underground cisterns that hold around 3600 gallons each. I also dug two ponds that hold about the same amount of water.
While the roof system diverts water to the cisterns, I have dug swales that direct water to the ponds. Utilizing my land to harvest water and direct it to the ponds significantly increases my ability to harvest and store rainwater. Currently, I'm capable of harvesting and storing 20,000 gallons annually.

To automate my watering system, I built a water tower approximately 20 feet above ground. This tower provides plenty of pressure to direct water to any part of my homestead with no problem. About once a week, I pump 330 gallons up to the tank on the water tower, and from there, all the animals and gardens have automated water, even if my solar system goes down.
Even my outhouse has a mini-system to harvest rainwater for a handwashing station. The 5-gallon container has never dried up since the first time it filled.
Rainwater Harvesting Playlist
GROW YOUR OWN FOOD
When I first moved off-grid, I brought about a one-year supply of canned food, flour, sugar, etc. Since then, I have learned to garden.
I currently keep several types of lettuce and a few vegetables growing year-round, with my largest harvest of the year being around fall.
I have learned to raise and care for pigs and keep hundreds of pounds of pork on my homestead at all times. I no longer need to buy meat.
My chickens provide about six eggs a day for most of the year. I have never sat down at a restaurant since I've lived here, and I've only grabbed fast food twice in nearly four years.
About 25% of my dog's food is grown on the homestead, and I have harvested thousands of pounds of native grass for my livestock. I will continue to focus on growing feed for livestock and look into rotating them on pasture.
I have loaded my root cellar with a one-year supply of food storage, and in fall, when I fill it up with squash, it easily keeps until spring.
BUILDING YOUR HOME
Moving off-grid with a camper van meant I had shelter before I arrived. You could do the same with an RV or trailer.

The first shelter I built on the homestead was my shop. You could build a home exactly the way I built my shop depending on where you live. I spent about $4000 on building materials.
Before building, I considered the topography of my homestead. I built where water would not accumulate, and when it finally did rain, I saw where water did accumulate and graded the driveway out towards swales that pull water away from my shop, into ponds. If you're anywhere near a flood plane, you should elevate your buildings to be above the possible flood level. Even if you're not on a floodplain, you should build on pressure-treated skids at the least. I didn't have much money, so I bought standard 4x4s and treated them with a fuel/oil mixture and torched them.

Your floor and walls should be framed on 16" centers. After stick framing the floor, you should sheet it with 3/4" flooring and build your walls on top of it. It's very windy here, so I buried 6 4x4 posts about 3 feet in the ground in the corners and center of my floor. I attached the walls to the posts.

I built rake walls on both ends with one side of the shop about one foot taller than the other. This way there is a pitch going away from what will be the center of the shop. On the opposite side, I built an awning that matched the pitch over the shop. This way I can park under one side and enclose a shop on the other side. I covered the roof in metal roofing so I could easily harvest rainwater to store in containers and cisterns.
ANIMAL SHELTER
It was just my dog Incus and I when I first arrived on my raw land. We both stayed in my camper van. The first animal shelter I built was for chickens.
Using scrap material, I framed a floor and created an arch with rewire (similar to cattle wire). In the back of the hoop house-styled chicken shelter, I built a two-story coop: the bottom for the chickens to lay eggs and the upper for them to retreat from the cold. All of the stick frame was 2x4, and I wrapped it with OSB. The stairways are simply OSB with strips of OSB for steps. In addition to the rewire, I wrapped the entire shelter in chicken wire. Wire mesh would be better to keep out snakes, but it's done the trick. My original concern was coyotes, so I wrapped the entire bottom in chicken wire to keep them out as well. The top back of the coop is covered with a billboard tarp. I buy them used, and they hold up well. The door is closed with a simple locking latch.

I keep the coop clean all year except in winter. I allow the compost to build up, which provides additional heat for the chickens. I have 5 hens that have been perfectly healthy in that shelter going on four years now.

I tried my hand with goats and pigs and decided I prefer the latter. Regardless, the pens and shelters remain the same. The first pen I built I used tree branches for posts and fenced in about a 30x10 area. In fact, this area started out as a garden.
I simply split the area in half and using pallets I built a three-sided shelter in each half and covered them in corrugated steel panels. I later added another pen roughly equal in size to the two original pens.
They're all wrapped in rewire, and at least the bottom foot is wrapped in 1/4" wire mesh to keep the piglets from escaping. I use these three pens to move the pigs around to breed them, keep them separate, and one for piglets that have aged out. This small system allows me to grow all the meat I need here on my homestead.
CHEAP AND EASY FENCING
My first fence, like most everything else I built at first, was frugal and very basic. I built my gates from scrap material. This first fence served a few purposes: keeping my dogs in, keeping coyotes out, and painting a clear picture for humans that this is private property. The fence consisted of about half the T-posts you should use and no strong corner posts. I welded T-post corners knowing I would eventually upgrade them, but this original fence is still standing, doing its job. In fact, it keeps the horses from coming into the homestead from their pasture now, but I will upgrade it soon and build it the same way I have built the perimeter fence.
The original fence is 7 strands of poly electric fence wire. It's cheap, and it will jolt you. Animals touch it once and stay away. In order to make it work, you need a powerful charge controller to electrify the fence, and you need to place several grounding rods near the unit and around the perimeter.
The outer perimeter fence didn't come into play until I purchased horses. This fence needed to be strong. I used eight-foot, pressure-treated 4x4s for the corners and sides of gates. I placed one upright about three feet deep in concrete, then ran two more eight-foot 4x4s at about 45°, running parallel to the fence on either side, to brace the main post about halfway up. After all posts were set and cured, I ran three strands of high-tension wire starting from the bottom and working my way up around the entire perimeter. I ran two strands of poly wire to fill the gaps until I could afford to replace them with high-tension wire. This fence has held up perfectly, and I've had no trouble with the horses. Soon, I'll upgrade the original inner fence to match the perimeter fence.
HOMESTEAD DEFENSE
With fencing out of the way, homestead defense is an important and overlooked quality any homestead should have. At a bare minimum, you should be armed for unexpected situations, be it a black bear that comes looking for dinner, an aggressive stray dog, or unsavory individuals.
My homestead has many layers of security, and I'll detail them for you now. By the time anyone gets within half a mile of my homestead, I know they're there. I have motion detectors set up half a mile away that notify me. Even if it's just a rabbit, I know. Again, at the end of my long drive, I have another sensor that notifies me with a distinctly different sound. If I'm feeling busy and ignore the first notification, I never ignore the second. Someone is definitely approaching my first gate. By the time someone approaches my driveway, they're already on live camera that is recorded to the cloud. Once someone is on my driveway, I can read their license plate and have video of their vehicle; by the time they approach my first gate, I can identify them inside their vehicle. 360° of my property and the property near mine is covered at all times.
I can communicate through the cameras if necessary, and so can any visitors. An added benefit to the cameras is that all my livestock and valuables are on camera as well. The fences provide more security by forcing visitors to stop at the front gate. This gate is about a quarter mile from my homestead, leaving them in a very vulnerable spot with nowhere to take cover while on my end, I have bulletproof dugouts around the perimeter of my homestead behind the second fence and gate. These dugouts are made with dirt, sandbags, and 3/4" steel structures. Behind all fencing, I have stacked old foliage, tree limbs, and more, making it impossible to get through without drawing a lot of attention. Inside my first fence is the horse pasture; my stallion and filly can definitely be intimidating, they'll easily keep predators at bay and deter many people. Behind my second fence are three very sweet, well-trained dogs that are absolute animals when it comes to protecting their yard. The electric fence is an added bonus. And finally, all the gadgets a man might keep to protect himself can easily reach out and touch anyone before they even turn down my drive. Some have called me paranoid. I call myself prepared.
Homestead Defense Playlist
CHEAP AND EASY WATER CISTERNS
I needed more than a few IBC totes for water storage. You can buy 3000-gallon tanks for about a dollar a gallon, but I didn't have ten grand laying around, so I thought of the cheapest way I could build my cisterns. I ordered enough billboard liners to build two 3600-gallon cisterns and a 4000-gallon pond for about $200.
I dug the cisterns roughly 16x5x5, and the pond is a more natural shape, about the same size. This provided about 14,000 gallons of rainwater storage capacity.
The ponds are simply a hole lined with tarp and swales leading up to them. The cisterns are holes lined with tarps, with a tarp stretched over the top covered in timber with a manhole covered in another tarp that's covered in earth. These work exactly like any other cistern, and the rainwater harvesting systems leading to the cisterns have screens in place to prevent pests from accessing them. Submersible pumps make it easy to pump water from the cisterns to the water tower or any other location on the homestead. The cisterns never freeze, making it possible to use this water year-round.
Cisterns Playlist
DIY WATER TOWER
In order to easily move water around the homestead with about 20 lbs of pressure, I built a water tower. The tower is about 20 feet above ground. It's built to easily hold 10,000 lbs but never holds more than 3000.

I have a float switch in the tower that activates the pump in the cistern when there's about 50 gallons of water left in the water tower tank. The pump takes about an hour to fill the tank. With the tank full, I can water the homestead for about a week without running a pump. The tower is simply 4 4x4 posts on a mound about 3 feet deep. Each footer is 120 lbs of concrete, and I poured a 3" pad at the base to prevent water from eroding the hill, with an overflow directing water to the swales if necessary. I used 2x4s for cross members and 2x6s for the deck up top. Each fastened with 6 screws and 2 lag bolts. I built a simple handrail to prevent falling off the top after I built a crane to hoist the tank up. Painting the tank solid black prevents algae from growing in the tank, and because it's in the sun, the tank only freezes a couple of days each year.
Water Tower Playlist
HIGH DESERT PONDS
As mentioned, the ponds I've built are simply holes in the earth lined with billboard tarps or pond liners. The reason they work so well is that I have taken advantage of the slight gradient of my land.
By digging swales leading to the ponds and grading the entire driveway to direct water to my ponds, I've had the pond fill overnight during the monsoon season and get nearly full over winter. I plan to grow shrubs and trees around the ponds to prevent algae growth, but so far it hasn't been much of a problem. Mosquito fish will prevent the very few mosquitoes I've seen, and I've grown duckweed in my aquaponics system that I'll be able to fill the ponds with. This will cover much of the surface, which will greatly reduce algae.
Ponds Playlist
MAKING SWALES 
Currently, I have about a quarter mile of swales dug. Just like gutters, anywhere water may accumulate, I've dug swales to redirect water to the ponds and gardens. This allows me to harvest thousands of more gallons than my roof system.
owner finance land frugal off grid food water shelter prepping survival
Eventually, I want to grow shrubs, foliage, and trees along the swales to prevent them from filling back up with sand and to grow more food. I plan to double the amount of swales I have to keep all areas from holding water and to harvest as much as possible.
OFF- GRID WATER FILTRATION 
What good is water if it's not safe to drink? Rainwater is perfectly safe to drink; in fact, it's much better than city water, but you need to store it so it doesn't get contaminated.
Storage containers should be opaque to prevent algae growth, which can make you and your livestock sick. The pipes and gutters running to storage need to be protected by screens to prevent pests from getting in. You can safely add about 1 cup of bleach to 400 gallons of water to prevent bacteria from growing, and your water filter will remove 99.9% of the bleach. To safely filter all your drinking water for a small family, you can simply get two food-grade 5-gallon buckets. Install a bulkhead in the bottom of one bucket into the lid of the bottom bucket and install a tap a few inches above the bottom of the lower bucket.
After you stack the buckets, you can place a filter over the bulkhead, then a few inches of pea gravel, a few inches of clean sand, and a few inches of activated charcoal. Repeat this layer again, then top with pea gravel. You'll need to run about 10 gallons through to clean the charcoal. After that, you'll be safe to replace the substrate annually. You can buy the ingredients or make it all yourself on your homestead.
HOW TO MAKE SOIL & FERTILIZER
I have never bought amendments, compost, or soil to add to my soil here on the homestead. I have enjoyed the long, slow process of making my own. I wanted to experience the process of making everything possible from scratch as if I were out here completely alone. It has taken me nearly four years to create a garden large enough to provide most of my needs, filled with quality soil. If you did want a running head start, I would recommend simply hauling in a load of manure to compost.
It took time for me to accumulate enough livestock and foliage to make good compost. You could save a lot of time bringing your own. 
On day one, I walked my property, collecting cow pies left behind by grazing cattle. I crushed the pies and rehydrated them. I mixed in straw, which was about the only foliage I had, and began the process. It took about six months to make my first batch of soil. In the meantime, I planted a full garden in native soil and it worked! The soil is loamy; however, it's not nutrient-dense or soft enough to grow carrots or potatoes very successfully. The trick is to add large amounts of organic matter to the soil. This will allow it to absorb and retain water and possess the nutrients your garden needs to thrive.
You can't grow in pig manure right away; it needs to compost for six months to be sure you won't get sick. Rabbit and goat manure, on the other hand, can be used right away. You can also make fertilizer with any of these manures. Simply fill about 1/3 of a 5-gallon bucket and top it off with water. Let it soak for a week, and you have fertilizer. You can use a ppm meter to make the exact formula you want and use specific manure for different NPK balances.
HIGH DESERT GARDENING
 The biggest issue I ran into initially with gardening was mice nibbling down my starts once I got them growing. It pretty much ruined my garden, year one.
You can overplant and get results simply by having large enough numbers of plants to feed the mice and still grow, but it's most efficient to keep farm cats. The issue with the cats is that eventually, they wander off and the coyotes get them.
I know people who have had cats for years though, and it seems to have worked because they brought full-grown cats out; it seems they're fast enough to get away. I currently don't have cats, and I thought I might give up on having them, but I'm going to try one more time. I plan to get a few older tomcats, and I'm working on fencing my entire homestead to keep them from wandering. Cats are a huge part of my homestead success; I just don't want to lose any more. Bucket traps help, but nothing is as efficient as having cats. Plus, they'll grow on you.
In year one, with no gardening experience, I planted a full garden in a 10x30 fenced area. Eventually, I wrapped it in 1/4" wire mesh, which helped keep mice out. I was able to harvest about 40lbs of produce that first fall. 
I was able to grow all kinds of produce; I nearly brought about 40 corn to harvest, but a freeze came through at the end of fall and wiped them out. The point is, you can do it, and you will get better results with improved soil.
Greening The Desert Playlist 
HOW TO BUILD A SIMPLE GREENHOUSE
 In order to block the wind, reduce direct sun exposure, increase humidity, and reduce the cold, a greenhouse is a must. You can grow during about a six-month period outside, but it's a harsh environment.
Once I had a greenhouse up, I was able to grow throughout the winter by placing plant fabric over the plants when it was below 25°F. Above that, most plants do fine. The greenhouse will also keep the dogs, cats, and mice at bay. Yes, even my dogs have eaten or damaged a lot of my trees and crops.
It's too windy out here to have much success with tent-style greenhouses, but if you stick frame a shed and wrap it in corrugated plastic, you'll have a sturdy structure that will hold up. I made tent-style greenhouses work when I had very little money, but eventually, it's best to stop replacing them annually.
My current greenhouse is about 10x20'. I placed sunshade cloth over the south side and the top to prevent extreme direct sun exposure. On top of that, I placed plant fabric, then the corrugated plastic. These layers are built-in and will stay up year-round. After experimenting in my garden, this has yielded good results throughout the entire year.
The most important thing to remember in a harsh environment, whether it's hot or cold, is mulch. Mulch will keep the heat in, the cold out, and hold moisture. You can lose all that water you add in a single windy day. You may as well not try to fight Mother Nature and get the mulch built into your soil and top it off each time you plant. I like to put down fresh soil, then top it with ground-up straw, water it down, then apply another layer the next day and water it down again. This seems to really help, especially outside, to keep the mulch from blowing away. If you can build a solid wall around your garden, that will also help a lot. The wind is about the harshest thing you'll have to contend with.
Gardening Playlist
 BUDGET GEOTHERMAL GREENHOUSE 
 One of the first projects I started was a geothermal/walapini-style greenhouse. Typically, people build one or the other, but I decided to build them together. The walapini component is a below-ground-level greenhouse, while the geothermal component consists of 200 linear feet of 4" corrugated tubing buried about 3 feet under the lowest level of soil.
In addition to having a 600-gallon aquaponics system and the sunshade cloth and plant fabric layers, my geothermal system stays about 20 degrees warmer or cooler year-round. This makes a huge difference in extending the growing season through the full year.
The aquaponics system never freezes, and the plants thrive all year. In the winter, I close it off, and in the summer, I open it up to circulate the air.
I even placed a beehive inside that can be entered from inside or outside, and the bees did well in there until I opened the hive one too many times, and they swarmed. 
Many people have voiced concern over the geothermal flooding, but as I dug it, I built up a 3-foot berm around the perimeter, and it has never leaked. Not even close. Also, the ground is largely caliche, which is made up of Portland cement, and it will not collapse.
Not only is the geothermal system very productive, it's also one of my favorite spots to sit back and enjoy the fruits of my labor.
 Geothermal Playlist 
SIMPLE AQUAPONICS 
My aquaponics system is located in the back of my geothermal greenhouse where less sun is able to directly hit it. The bottom tank is covered to prevent the sun from hitting most of the tank, this greatly reduces algae growth.  
 The bottom tank is a 400 gallon vinyl tank designed to hold fish. The upper tank is an old trailer that I lined with vinyl. Together they hold about 600 gallons of water year round which helps regulate the temperature in the greenhouse.  
 The system acts like a giant thermal battery which collects the heat of the day and slowly releases it all night to warm the greenhouse.  
 The water has never frozen, even when it's -10F°. In my location I could keep Koi, bass or bluegill easily. Trout would work as well they just require more oxygen. Tilapia would not be a good choice as my water doesn't get or stay hot enough.  
 The system loses very little water to evaporation and only requires the occasional top off which helps keep the water clean.  
 I built a simple bell siphon that allows the upper tank to fill to the top of the substrate before overflowing into the siphon which activates it and the water drains to the tank below. I have a 1600 gallon an hour pump which pumps the water back up to the top tank and this cycle completes roughly every 15 minutes. This adds a lot of
 oxygen to the system and continually filters the water. It also prevents mosquitoes.
It took about six weeks to cycle the system before it was safe for fish. I planted mint right out the gate and eventually got some mosquito fish, which are small mosquito eaters. They died off during winter, but the previously named fish would thrive; I just haven't gotten to adding them yet.
My mint plants thrived all winter, and I've harvested a lot of mint from the system. It requires a decent-sized solar system to keep the pump running. About 600 watts of panels and 400Ah of battery should do the trick.
I've tried a few systems in there and have never been able to keep it running 24/7, but soon I'll connect the system to my wind turbine, and I think it will be enough to power everything.
The substrate I used was simply cinder rock; it was only about $30 for a truck bed full. It required a lot of rinsing to get all the loose red out, but it's worked well.
I've had a couple of mice fall in and die, but by keeping an eye out and removing them quickly, the system has never gotten out of whack.
Aquaponics Playlist
HOMESTEAD LIVESTOCK
Livestock can provide many benefits to your homestead: manure, food, hides, pest control, homestead defense, and more.
When I started out, I had very little experience with livestock. The experience of caring for dogs definitely helped.
The first livestock I purchased was baby chickens. It was warm enough to keep them without extra heat, so I got them a bit later in the spring. No matter what livestock you get, you'll need to prepare to care for them.
After a few months, chickens pretty much care for themselves aside from food, water, and cleaning up after them, but you need to keep an eye on them to prevent issues like fleas or separating them if they fight too much.
Farm Fresh Homestead Eggs and Egg laying hens
My hens each lay about 1-2 eggs a day, and five hens keep me pretty stocked up on eggs. In fact, I often feed eggs to my pigs and dogs.
I tried goats, but I found that they were just too loud for my liking. I'm homesteading largely for the peace and quiet, and in my small homestead, the goats knew my every move and would scream any time I made a peep, no matter how much I fed them. I'm not a big fan of the taste of goat either, so I phased the goats out after putting four of them in the freezer. With goats, I had to learn to trim their hooves, and their care was more demanding than chickens.
Shortly after starting with goats, I bought a breeding pair of Vietnamese potbelly pigs. They're a smaller breed that is easier to handle alone but still bred specifically for meat. I have enjoyed them much more. It's still tricky to castrate the piglets and catch adults and trim hooves occasionally, but overall they're very easy to care for and produce well. I have chosen to focus on producing pork as my main goal.
Many ask me why I don't have more livestock, and the main reason is that the more variety you have, the more complete setups you need: more waterers, more pens, more gear for each.
Currently, I keep chickens for eggs, pigs for meat, and I'm training two feral horses to be ridden. I plan to train them to pull a wagon and work around the homestead.
Horses are the most demanding livestock I've owned in many ways, but I believe they'll yield large dividends after I've trained them. In order to keep horses, I had to fence the perimeter of my homestead to create a pasture. I had to make sure the fence around my homestead was strong enough to keep them in. I built two stables, one for each horse, so I can keep them separate if need be or train them individually. I also built a round pen to train them to lunge and more. It's taken several months to train the horses, and I spend time doing so with them nearly every day, so it's a pretty large investment. The require feed three times each day.
One of the best rewards of keeping livestock is the manure they produce. I compost it and amend my soil with it, therefore having very nutrient-dense soil with no store-bought additives.
Goats Playlist
HOW TO RAISE CHICKENS
Chickens are pretty easy to keep, but babies need to be around 98°F for several weeks, requiring electricity. For this reason, I simply wouldn't get baby chicks until summer is approaching, maybe a bit earlier if you have hens that will care for them, but not all hens will. The electricity required to keep heat lamps going or to incubate eggs is just too demanding until you have a very large solar system, mostly because it has to run all night.
To protect your chickens from snakes and coyotes, you should wrap your chicken coop with 1/4" wire mesh. Chickens like to sit on a perch, so you should add a few to your coop. They enjoy dirt baths, so having a few inches of dirt at the base is beneficial; this is how they naturally repel pests. If you allow their manure to build up in fall, it will provide great insulation for them all winter, and after the temperature stops falling below 40°F at night, you can clean the compost out and keep it clean the rest of the year.
It's easy to build an auto waterer for your chickens; I only top mine off once a week, and you'll know if it's empty because they'll approach you when you walk by to let you know they need more. I have also built an auto feeder that lasts weeks at a time; it reduces waste and gives them something to do, pulling out a bit of feed at a time.
If you want to raise chickens, you'll need a rooster to fertilize the eggs, but you may need to keep him separate because they can be very rough on the hens, removing all their back feathers. Also, most hens are bred to no longer be broody, which means they won't make good mothers. You need hens that are broody if you want them to raise their chicks. Some breeds are much more broody than others.
Chickens Playlist
HOW TO RAISE PIGS
Pigs are pretty easygoing, but piglets absolutely need to maintain about 98°F in the first few days. For this reason, I try not to have piglets unless it's getting close to summer or before fall. If you want to raise piglets, the mother or sow will need a partition at the back of her shelter. This partition gives the piglets a safe place to retreat to so they don't get squished and suffocated while still being able to feed.
After about two weeks, you'll want to castrate the male piglets. The way their testicles sit, you cannot simply band them like you can with goats. In order to make this easier, I built a platform with three pieces of wood, each a bit longer than the piglets and each a bit wider. I attached a door hinge to both sides of the center piece so I can lay a piglet on its back and tie the platform closed surrounding the piglet so it can't roll and move. With the piglet secured, I use a scalpel to slice a hole about 1/2 an inch in the scrotum. By gently pinching a testicle, you can see where to slice. Once you're through the skin, the testicle will pop out, and you can pull it out until the ductus deferens rips out. Most people simply spray the wound with purple vet spray and put the piglets back in the pen. I use sutures to close the wound. It's pretty easy, and if you use disposable sutures, you don't need to remove them.
The reason for castrating the piglets is apparently the meat will taste better, and you'll prevent unwanted breeding. They will breed within months unless you prevent it. You may also need to separate the boar from the babies to prevent him from breeding or harming them.
If you need to bottle feed a piglet because it's too small, or the mom isn't doing a great job of caring for it.  You can buy livestock milk feed and mix up the appropriate blend for piglets.  They need to get as much colostrum from their mother right away.  If they can feed for a day or two that would be best before your decide to bottle feed.  The formula goes bad after 12 hours so make sure to keep it fresh.  You can use an eye dropper when they're very small,  a livestock bottle feeder or a pan of you have nothing else.  
Pigs Playlist
HOW TO TRAIN FERAL HORSES
I've never owned horses or really been around horses much until I bought mine recently. I bought a stallion mustang that is three years old and a filly quarter/mustang. Both were born on a large ranch to parents who were feral horses.
Neither of my horses had been handled before being placed into a trailer and delivered to my place. Feral horses are nearly wild horses, but at some point in their lineage, they had been domesticated.
After buying my horses, the first thing I did was build a couple of stables and a round pen to make sure I could house them. I added an automated waterer so they would always have water. Next, I began to fence the perimeter of my property. I received my stallion, Sage, first and had to keep him in the round pen and stables for one month while I installed the perimeter fence. Eventually, my filly, Ginger, was old enough to be weaned, and I brought her home as well. That first day, the horses ran and played together on their new pasture.
From day one with my stallion, I would pet him and spend time with him at least 30 minutes nearly every day. When I got Ginger, she was six months old. I let her run and play with Sage for a month before I began to work with her. My stallion spooks much easier than Ginger, and to this day, I haven't quite gotten the halter on him, but Ginger allowed me to halter her on my third attempt. What my stallion excelled at was lunging and learning to be gentle around me. After six months, I've almost haltered him, and I believe once he allows me to do that, we'll make a lot of progress. My filly has allowed me to halter her, lead her, place a saddle blanket on her back and a saddle; this past week, I was able to trim her hooves. She's way ahead of the curve. I don't plan to ride her until she's at least two years old. By then, she'll be very used to being handled.
I've learned that patience is the way with horses; you have to earn their trust. I've learned how to better interact with my dogs because of my horses. With the experience I've had, I believe if I get another horse, I'll be that much better at training it.
The horses go through about 25 gallons of water each day total and about 20 lbs of hay each. I give them about a cup of sweet feed occasionally because it's like a multivitamin, providing nutrients they may be lacking. I've also given them trace minerals and a de-wormer.
If you were to ask me how to train your horses, I would recommend starting with being around them. Petting them a bit if they'll let you and slowly progressing to being able to run your hand down their legs to eventually touching their hooves, belly, and rear end. If they spook at all, move back to a point where they were comfortable. If they love their ears or butt scratched, do that. It will show them that it feels good to be hands-on.
After some time, you can try to lunge them. By driving them around a round pen, you develop leadership like they do in the wild. They naturally want to be led, so you can teach them that you're the leader. Another way to do this is by taking their space in the pen. With a whip or a flag, you can walk to the spot your horse was standing, forcing them to move, slap the flag on the ground, and stand there, facing away from them. This shows them you're dominant and the leader. When you drive them around the pen, the moment they give you both eyes, stop and face away from them. This is rewarding them for giving their attention to you. You're teaching them that if they turn to face you, you'll back off. It's much easier to halter a horse's face than its rear end.
It's important to train your horse several days in a row. If you can't spend 30 minutes every day with them, then spend 30 minutes a day for at least three days in a row when teaching them something.
Next, I would start to introduce them to items; in a sense, you're starting to gentle them by doing so. Let them smell and touch each item before you touch them with it. Show them a brush, let them interact with it, then slowly try to brush them. Continue to work with them until you can do so. If at any time you're struggling with something for several days, move on and try something else. There will likely be certain things your horse won't let you do at first, but other things they will allow, and each horse may be different. So don't give up, just try something else if you have to.
In the same manner, you'll want to introduce the halter, and if you have to, you can use treats, but be careful not to train them to be pushy with treats. If they are pushy, stop giving treats and reaffirm your personal space with your hands or a flag to keep them back.
A younger horse will likely be much easier to train than an older horse, especially if feral, they will likely spook easier. Always be careful around them as even a baby can run you over. If they do something they shouldn't, be assertive and tell them no, like you would a dog, but don't lose your temper with them. Remember, as big and scary as they may seem at first, even a three-year-old is just a baby. Be gentle and patient, and they'll come around.
Horses Playlist
HOW TO BUILD A ROOT CELLAR
Being able to safely store the food, you grow on your homestead is an important part of the process.  You can jerk meat to store for the long haul,  glass fresh eggs for storage,  can produce and store perishable goods in your root cellar.  There are more ideal locations than the high desert to install a root cellar but even my frugal root cellar does a fine job of extending the life of my food stores.  
 At it's roots,  a simple root cellar is simply a hole in the earth with shelves, a door and ventilation.  My root cellar is roughly 8'x8'x8'. My land is loaded with caliche which makes it hold its shape well but after digging a larger hole I lined it with sand bags to reach the size it is now.  Ideally your root cellar should be 10-12 feet deep.  Mine is closer to 8. I dug my root cellar by hand, with a shovel and used the dirt I pulled out to build a berm around and over the top.  It's not perfectly ideal but it's what I was able to do at the time and I'm able to store fresh produce in there year round.  
There's a manhole at the top. I've insulated the door with about 6 inches of foam to help maintain the temperature and I've installed a 100w solar panel and 100ah battery to run a tiny fan 24hrs a day to reduce humidity and I placed a motion activated light inside so I can see what's on the shelves. 
People often ask if I've had any issues with mice and after years of use, I have never had mice in my root cellar.  It's sealed off from outside pretty well and it would be very difficult for a mouse to get in from the manhole.  
Root Cellar Playlist
HOW TO BUILD A SOLAR SYSTEM

I am no electrician. That being said, solar systems don't have to be complicated. These days you can buy all in one units to make your life easy but if you're willing to do a little reading,  anyone can set up a simple and effective system and save money by piecing it together themselves.

I recommend a 48v hybrid charger/ inverter. These are often available with a 6000w inverter which will power just about anything on your homestead. You'll need at least 400ah of battery storage and 600w of solar panels.  You can often buy panels used that are in good condition. A system of this size is relatively affordable, should handle most of your needs and it's expandable.  As your homestead grows you'll be able to add thousands of watts of solar panels and another 400ah of batteries will go a long way.   

Make sure you install a solid ground rod in your shop or home and ground your system to prevent damage. 

Solar System Playlist

Frugal Off Grid "Build an off grid homestead with next to nothing" best off grid living eBooks
HOW TO MAKE HOMESTEAD INCOME
There are many ways to make income from your homestead. It seems like remote jobs are easier to find these days. Social media can be a good way to spark interest in your small business. By offering value to people for free they may be more inclined to buy what you're selling.  If you are passionate about something it will likely be your best product. 
If you know a trade, such as carpentry, welding or operating heavy equipment those are all good sources of income.  If you like to bake, you can make good income doing so. If you're in a larger community you can offer landscaping, snow removal and handy man work. 
In all of these scenarios, if you under promise and over deliver you will get return customers. 
So you can earn income online or in person and better yet, you can do both. By creating several sources of income you can create financial security. 
Maybe you'd like to setup at a local farmers market. Your goal may be to build a large greenhouse so you can sale excess produce.  
You can write books, create content, give most away and sell some. And of course, you can always get a regular job if that's what you're best at. 
What might be more important than how you make your money, is how you spend it.  Reducing your bills and overall costs makes it easier to budget for what you need and if your needs are met then aren't you better off than the guy with a flashy home and car that he may never truly own?
Need more content? 
 Please consider sharing this guide with your family and friends, leave a comment below and if you'd like to support my homestead I have a great line of homestead products on my website
If you would like my recommendations for your specific piece of property, you can book a video call here
Back to blog

9 comments

Invaluable knowledge. Thank you!

Melisha

I’ve been following you for a long time and learned so much from your videos. keep being awesome.

Okietrucker918

Hey guys;
AZHB2097 is about 50% of the way to being passed. I’ll post an update soon.
In regards to feed for the animals, I spend about $150 a month.

Frugal Off Grid

How much does it cost to feed all your livestock?

Mr.Lowrider

Thank you so much for this resource. Any updates on AZHB2097?

Tammy Nehemiah

Leave a comment

Please note, comments need to be approved before they are published.